A long time ago, some guy discovered that if you positioned the camera
in a 3d environment JUST RIGHT, you'll eliminate perspective. I don't
know who that guy is, but if it weren't for him, some OTHER random guy
would have figured it out, and thus, the original guy wouldn't be
recognized for it. Whatever, the point is, perspective is eliminated.
Perspective is that thing that makes it so that things closer to you
are bigger, and things farther away are smaller. Obviously, on an old
game system, it's a royal pain in the arse to have to deal with the
varying sizes, and not to mention it even obscures things at times. This
is sorta kinda where isometric view was somewhat born, to an extent.
Isometry was probably around much longer than that, but the concept of
putting it in a video game took longer to be realized.
Alright, do you know what the word isometry means? Iso, and metry. Iso
sounds like isotope from science, which means "same element" or something,
so we can guess that iso means "the same". Next, metry. What does metry
sound like? It sounds like metric or something, which is a measurement
system, so I guess it means measure. Put it together, and you get "the
same measure". Make sense? Probably not. Remember what I said about
perspective? If you get rid of perspective, do you have anything else that
can vary the size of something? Guess not. This is isometric view; it's a
way to simulate a 3d environment, even though it's really a 2d environment.
Now that we understand what everything means, you're probably wondering how
you get rid of perspective. Actually, you're probably not wondering, but
let's just say you are. Guess what, you can't actually remove perspective
completely from view, otherwise it screws things up. Instead, you just
'cancel it out'. The concept behind this is that you eliminate anything that
can actually come towards, or go away from the camera. The easy way to
achieve this is to just position the camera in such a way that nothing moves
directly on the come-towards-and-go-away-from axis. This axis can be either
X, Y, or Z, since it varies depending on how the camera is looking. I don't
think there's but one way to do this. Listen carefully here so you don't
get lost: Look at the playfield at a 45 degree angle, and then pitch the
camera down 45 degrees. Don't do anything to the remaining axis, because
that's the "roll" axis, and everything will look sideways if you mess with
it. Time for a visual:

Let's say I have that thing. Let's call it a tiled surface. Now hang on, that
already looks isometric, because if I put something on it, it can't appear
close or far away, right? I think that this can be isometric, but I could be
wrong. Anyway, this isn't quite the 'isometric' that we're looking for. Know
why? Because it's not 3d. There are only 2 useable dimensions like this
(x and y), because we can't have something be close or far away, and the third
dimension lies exactly on that close/far-away axis. Let's fix that. I can't just
angle the camera down, because although that does move z out of the close/far-away
axis, it also moves y into it, so we can't do that. Eventually we do have to
angle the camera down, but let's move both x and y out of the way so it doesn't
move into the close/far-away axis when we do angle the camera down:

For those who are very observant, you'll notice that it looks like it got bigger,
but forget about that, that's just something I did. Now, if you observe what
you're SUPPOSED to, you'll see that I just rotated the camera 45 degrees CCW.
Note what happened to X and Y. An increasing X value will go down and to the right,
and an increasing Y value will go down and to the left. Other games may have
the x and y axises different, but this is how I do it. We still have a problem,
z comes towards us, so you can't see it in this shot. Here's how to fix it:

Beautiful! Now we can see all 3 dimensions in such a way that all 3 will affect
the 2d position of an object. The way you handle Z is up to you (whether you want
0 to be the lowest height, or the heighest height). Now, this method of isometric
drawing is not 100% true isometric, because in isometry, all horizontal lines are
drawn at a 30 degree angle. A 30 degree angled line will not look neat on a
computer screen, because the pixel pattern will be uneven. To fix this, we just
use a pixel pattern of "move horizontally 2 pixels, and then go up or down 1",
and that's close enough. Notice how the corners of the tiles are lengthened, like
the top and bottom corners are 4 pixels long, and the left and right corners are
2 pixels tall. This is because I used an even number for the tile size. Using an
odd number (which most tile-based game systems will not support) will cause the
edges to be nice and sharp. Even number or odd, they both work, so booya.
So now we know how to draw a flat plane, but what about slopes? Let's see what
Marble Madness looks like:

DAMN, that is SEXY. Ok ok, but you have to admit, that looks really cool. Now when
drawing these slopes, this is where the grid on the surface comes in handy. Notice
how each slope in each direction matches up absolutely perfectly. If you are
drawing a slope that goes in X or Y direction alone, then it's easy to draw it.
If you were to draw a grid of vertical lines, where each tile's left edge began,
you'll notice that the lines would be evenly spaced apart. That's step one. Next,
draw a line which would be the edge of the tile that this slope is going to be
attached to. Then draw the inner slope line (if this slope tile were to be
connected to a corner piece, the inner line would be the line closer to the corner
piece, and the outer line is the opposite). The start of this slope line DOES NOT
OVERLAP the other tile's edge line. Instead, it starts just under it. This slope
line keeps going until the other tile's edge line ends, so if you drew a vertical
line through the ends of the edge line, and the slope line, it would match up.
Now you have half of you tile drawn. Just select what you did, and copy it. Flip
it horizontally and vertically, and paste it right next to the other half. Do not
raise or lower the one of the halves, just put them right next to each other.
Here's a visual to help you understand:

You can probably figure out how to make steeper slopes. Now here comes the fun
part! TILE FUSION!! Just flat tiles and slopes aren't that interesting, so let's
combine some tile styles to make a rhyme! And then we'll make some new tiles.
A corner piece is easy. Just take two slopes of opposite sides, cut the inner half
out of both slopes, and slap the remaining halves together, like this:

Now it's time for non-sloped dips and bumps in height. These are where walls
usually come from... unless you make it so that the tile just hovers, and the
player falls through if he walks under it. Both work. Let's say I have this
landscape:
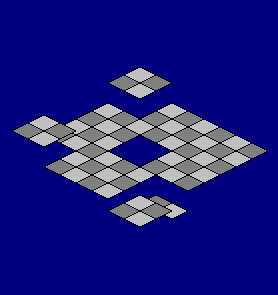
Though technically correct, see how confusing it looks? The tiles in the center,
did I just remove them, or are they hanging out at the bottom there? The dilhema
with the center tiles is what's called an optical illusion. You really don't know
for sure if those tiles at the bottom are supposed to be in the center.
Unfortunetely, there are not many creative ways to get around that optical
illusion. Now, if this landscape were just a tad larger, you wouldn't even see
those bottom tiles, if they belonged to the center. When you are creating an
isometric level, you MUST avoid mass view obstructions, because there is absolutely
no conventional way to check what's in that hole, unless you have a top-view
minimap in the corner or something. Just for reference, no, those tiles at the
bottom are the bottom tiles, and the hole in the center of the landscape is just
a hole. Ok, now that we have this technical crap out of the way, let's view some
ways to dress up this tile mess:
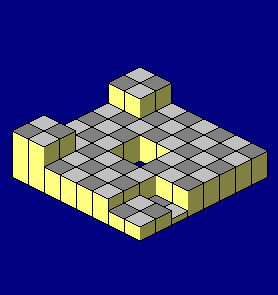
Look at the difference! Now we know *FOR SURE* that the center hole is just a hole,
and no tiles in it, and we also know the tiles at the bottom can NOT potentially
be tiles in the hole. Not only does this look neater, it also clarifies the
landscape.

Whoa, dammit, now I can fall off the landscape if I'm not careful around that
bottom area. This specific isometric level map assumes that every tile has exactly
one height, which means there can not be more than one tile in any given tile
space, period. See where I cut the wall out at the bottom? It looks like I could
have that stairs effect continue under those other tiles, right? Sorry, I can't,
unless I add some extra lines of code to my isometric tile renderer and my physics
engine, and not to mention hog up some more ram. The previous example made it
impossible for the player to be 'underneath' a tile. This example opens up that
possibility, but unless you make the changes I explained, there won't be anything
underneath the tiles, and you'll just fall off. Hey, at least it makes the
landscape somewhat kinda sorta more interesting, and maybe more challenging too.
Hi, I'm a footer.
![[i am a wootest]](/wootest_r.png)